**Houdini, venv, OpenCV and cats**
[ <- ](..) _2022-12-30_
# Intro
Houdini ships with a Python interpreter and a bunch of useful libraries. However it's often useful to install additional Python modules to be used with Houdini. In this post I will explain how to use Houdini with Python virtual environment and how to install new modules with pip. As an example I will install the OpenCV Python module and make a simple facial detection COP node with it.
I will use Houdini 19.0.720 on Windows and Linux. Exact versions shouldn't matter though, the same approach should work with older/newer Houdini versions.
I will assume a basic exposure to using a shell, Python modules and virtual environments.
The following locations will be used in this post:
- Houdini install location
- `/opt/hfs19.0.720` on Linux (🐧)
- `C:\Program Files\Side Effects Software\Houdini 19.0.720` on Windows (🪟)
- Virtual environment location
- `/home/juraj/hou_venv`
- `C:\Users\Juraj\hou_venv`
- This is the working directory for majority of commands in this post
I will use the terms _virtual environment_ and _venv_ interchangeably. I will do the same with terms _Python modules_ and _Python packages_. Those terms are not identical, but similar enough for the needs of this post.
# Creating a virtual environment
Let's start by creating an empty virtual environment. That can be done with the module [`venv`](https://docs.python.org/3/library/venv.html), which has been part of the standard library since Python 3.3.
Speaking of Python versions - it's the best to create a virtual environment with the same Python version as the one that Houdini ships with. Or at least matching major, minor version parts. This will ensure that our new modules work as expected.
You can find Houdini's Python version easily, either by running the `hython` program, or by opening _Python Shell_ pane in Houdini. In either case I see the following on Linux and Windows:
~~~ python
🐧
Python 3.7.13 (default, Jun 14 2022, 11:41:42)
[GCC 9.3.1 20200408 (Red Hat 9.3.1-2)] on linux
Houdini 19.0.720 hou module imported.
Type "help", "copyright", "credits" or "license" for more information.
~~~
~~~ python
🪟
Python 3.7.13 (1 file(s) copied., Jun 14 2022, 11:48:46) [MSC v.1929 64 bit (AMD64)] on win32
Houdini 19.0.720 hou module imported.
Type "help", "copyright", "credits" or "license" for more information.
~~~
On Linux I have Python 3.7.15 installed with a package manager, on Windows I have 3.7.9 installed from [python.org](https://www.python.org/downloads/).
Go to an empty folder where we want to create virtual environment in and create it. I will put comments only next to the Linux commands, Windows will do the same steps, but the commands might differ slightly.
~~~ bash
🐧
$ cd /home/juraj/hou_venv # Enter the virtual environment location
$ python3.7 -m venv . # Create virtual environment in the current directory
$ tree ../hou_venv -L 4 # Let's take a look at what gets created
../hou_venv
├── bin
│ ├── activate
│ ├── activate.csh
│ ├── activate.fish
│ ├── easy_install
│ ├── easy_install-3.7
│ ├── pip
│ ├── pip3
│ ├── pip3.7
│ ├── python -> python3.7
│ ├── python3 -> python3.7
│ └── python3.7 -> /usr/bin/python3.7
├── include
├── init.sh
├── lib
│ └── python3.7
│ └── site-packages
│ ├── easy_install.py
│ ├── pip
│ ├── pip-22.0.4.dist-info
│ ├── pkg_resources
│ ├── __pycache__
│ ├── setuptools
│ └── setuptools-47.1.0.dist-info
├── lib64 -> lib
└── pyvenv.cfg
~~~
~~~ cmd
🪟
>cd C:\Users\Juraj\hou_venv
>python -m venv .
>tree /A /F
C:.
| pyvenv.cfg
|
+---Include
+---Lib
| \---site-packages
| | easy_install.py
| |
| +---pip
| |
| +---pip-20.1.1.dist-info
| |
| +---pkg_resources
| |
| +---setuptools
| |
| +---setuptools-47.1.0.dist-info
| |
| \---__pycache__
|
\---Scripts
activate
activate.bat
Activate.ps1
deactivate.bat
easy_install-3.7.exe
easy_install.exe
pip.exe
pip3.7.exe
pip3.exe
python.exe
pythonw.exe
~~~
(I've truncated `tree`'s output on Windows.)
To use the virtual environment, we need to activate it first. After activating it we can check installed packages and we should see an empty Python virtual environment.
~~~ bash
🐧
$ source bin/activate # Activate our new virtual environment
(hou_venv)$ pip freeze # List available packages (nothing gets printed out)
~~~
~~~ cmd
🪟
>call Scripts\activate
(hou_venv)>pip freeze
~~~
Note the `(hou_venv)` indicator in shell showing that we have a virtual environment _hou_venv_ activated.
We have an empty virtual environment now. Let's digress for a bit and after that we will use our new virtual environment with Houdini.
# A short digression about where Python looks for packages
At this point I should briefly explain how Python is aware of our virtual environment and where it looks for installed packages.
We can check search paths for Python packages by inspecting [`sys.path`](https://docs.python.org/3/library/sys.html#sys.path):
~~~ bash
🐧
(hou_venv)$ python -c "import sys;print(sys.path)" # Print sys.path from venv's Python
['', '/usr/lib/python37.zip', '/usr/lib/python3.7', '/usr/lib/python3.7/lib-dynload',
'/home/juraj/hou_venv/lib/python3.7/site-packages']
~~~
~~~ cmd
🪟
(hou_venv)>python -c "import sys;print(sys.path)"
['', 'C:\\python\\3.7.9\\python37.zip', 'C:\\python\\3.7.9\\DLLs', 'C:\\python\\3.7.9\\lib',
'C:\\python\\3.7.9', 'C:\\Users\\Juraj\\hou_venv', 'C:\\Users\\Juraj\\hou_venv\\lib\\site-packages']
~~~
This includes paths to modules in the standard library, which are reused from the system Python installation. At the end you can see path to the `site-packages` folder in our virtual environment, which will contain our new packages.
But this behavior is dependent on the location of the Python binary that we run. For example the Python binary shipped with Houdini won't see our virtual environment's packages, even if it's been activated.
~~~ bash
🐧
(hou_venv)$ /opt/hfs19.0.720/python/bin/python -c "import sys;print(sys.path)" # Print sys.path from Houdini's Python
['', '/opt/hfs19.0.720/python/lib/python37.zip', '/opt/hfs19.0.720/python/lib/python3.7',
'/opt/hfs19.0.720/python/lib/python3.7/lib-dynload',
'/opt/hfs19.0.720/python/lib/python3.7/site-packages']
~~~
~~~ cmd
🪟
(hou_venv)>"C:\Program Files\Side Effects Software\Houdini 19.0.720\python37\python.exe" -c "import sys;print(sys.path)"
['', 'C:\\Program Files\\Side Effects Software\\Houdini 19.0.720\\python37\\python37.zip',
'C:\\Program Files\\Side Effects Software\\Houdini 19.0.720\\python37\\DLLs',
'C:\\Program Files\\Side Effects Software\\Houdini 19.0.720\\python37\\lib',
'C:\\Program Files\\Side Effects Software\\Houdini 19.0.720\\python37',
'C:\\Program Files\\Side Effects Software\\Houdini 19.0.720\\python37\\lib\\site-packages']
~~~
The reason for this is that Python doesn't check our environment variables (set by the venv activation script) for determining whether it's in a virtual environment. It rather checks for the presence of `pyvenv.cfg` in a location relative to the Python executable. Take a look at the following commands:
~~~ bash
🐧
(hou_venv)$ which python # With virtual environment activated, python refers to this executable
/home/juraj/hou_venv/bin/python
(hou_venv)$ python -c "import sys;print(sys.path)" # We can see our venv here
['', '/usr/lib/python37.zip', '/usr/lib/python3.7', '/usr/lib/python3.7/lib-dynload',
'/home/juraj/hou_venv/lib/python3.7/site-packages']
(hou_venv)$ /usr/bin/python3.7 -c "import sys;print(sys.path)" # Calling system's python directly doesn't include our venv packages
['', '/usr/lib/python37.zip', '/usr/lib/python3.7', '/usr/lib/python3.7/lib-dynload',
'/usr/local/lib/python3.7/dist-packages', '/usr/lib/python3/dist-packages']
(hou_venv)$ mv pyvenv.cfg pyvenv.cfg_hidden # If we hide pyvenv.cfg then our virtual environment's python is no longer aware of venv's packages
(hou_venv)$ python -c "import sys;print(sys.path)"
['', '/usr/lib/python37.zip', '/usr/lib/python3.7', '/usr/lib/python3.7/lib-dynload',
'/usr/local/lib/python3.7/dist-packages', '/usr/lib/python3/dist-packages']
(hou_venv)$ mv pyvenv.cfg_hidden pyvenv.cfg # Let's restore pyvenv.cfg back
(hou_venv)$ deactivate # Let's deactivate our virtual environment
$ /home/juraj/hou_venv/bin/python -c "import sys;print(sys.path)" # We can see that we can access venv's packages by calling its python executable, without the need to activate it
['', '/usr/lib/python37.zip', '/usr/lib/python3.7', '/usr/lib/python3.7/lib-dynload',
'/home/juraj/hou_venv/lib/python3.7/site-packages']
$ /opt/hfs19.0.720/bin/hython -c "import sys;print(sys.path)" # Let's see what modules hython imports by default
['', 'ls', '/opt/hfs19.0.720/python/lib/python3.7/site-packages-ui-forced',
'/opt/hfs19.0.720/python/lib/python3.7/site-packages-forced', '',
'/opt/hfs19.0.720/python/lib/python37.zip', '/opt/hfs19.0.720/python/lib/python3.7',
'/opt/hfs19.0.720/python/lib/python3.7/lib-dynload',
'/opt/hfs19.0.720/python/lib/python3.7/site-packages', '/opt/hfs19.0.720/packages/kinefx/python3.7libs',
'/opt/hfs19.0.720/houdini/python3.7libs', '/opt/hfs19.0.720/packages/kinefx/viewer_states',
'/opt/hfs19.0.720/houdini/viewer_states', '/opt/hfs19.0.720/packages/kinefx/viewer_handles',
'/opt/hfs19.0.720/houdini/viewer_handles', '/opt/hfs19.0.720/python/lib/python3.7/site-packages']
~~~
~~~ cmd
🪟
(hou_venv)>where python
C:\Users\Juraj\hou_venv\Scripts\python.exe
C:\python\3.7.9\python.exe
(hou_venv)>python -c "import sys;print(sys.path)"
['', 'C:\\python\\3.7.9\\python37.zip', 'C:\\python\\3.7.9\\DLLs', 'C:\\python\\3.7.9\\lib',
'C:\\python\\3.7.9', 'C:\\Users\\Juraj\\hou_venv', 'C:\\Users\\Juraj\\hou_venv\\lib\\site-packages']
(hou_venv)>C:\python\3.7.9\python.exe -c "import sys;print(sys.path)"
['', 'C:\\python\\3.7.9\\python37.zip', 'C:\\python\\3.7.9\\DLLs', 'C:\\python\\3.7.9\\lib',
'C:\\python\\3.7.9', 'C:\\python\\3.7.9\\lib\\site-packages']
(hou_venv)>ren pyvenv.cfg pyvenv.cfg_hidden
(hou_venv)>python -c "import sys;print(sys.path)"
No pyvenv.cfg file
(hou_venv)>ren pyvenv.cfg_hidden pyvenv.cfg
(hou_venv)>deactivate
>C:\Users\Juraj\hou_venv\Scripts\python.exe -c "import sys;print(sys.path)"
['', 'C:\\python\\3.7.9\\python37.zip', 'C:\\python\\3.7.9\\DLLs', 'C:\\python\\3.7.9\\lib',
'C:\\python\\3.7.9', 'C:\\Users\\Juraj\\hou_venv', 'C:\\Users\\Juraj\\hou_venv\\lib\\site-packages']
>"C:\Program Files\Side Effects Software\Houdini 19.0.720\bin\hython.exe" -c "import sys;print(sys.path)"
['', 'C:\\Program Files\\Side Effects Software\\Houdini 19.0.720\\bin',
'C:/PROGRA~1/SIDEEF~1/HOUDIN~1.720/python37/lib/site-packages-ui-forced',
'C:/PROGRA~1/SIDEEF~1/HOUDIN~1.720/python37/lib/site-packages-forced', '',
'C:\\Program Files\\Side Effects Software\\Houdini 19.0.720\\bin\\python37.zip',
'C:\\PROGRA~1\\SIDEEF~1\\HOUDIN~1.720\\python37\\DLLs', 'C:\\PROGRA~1\\SIDEEF~1\\HOUDIN~1.720\\python37\\lib',
'C:\\Program Files\\Side Effects Software\\Houdini 19.0.720\\bin', 'C:\\PROGRA~1\\SIDEEF~1\\HOUDIN~1.720\\python37',
'C:\\PROGRA~1\\SIDEEF~1\\HOUDIN~1.720\\python37\\lib\\site-packages',
'C:/PROGRA~1/SIDEEF~1/HOUDIN~1.720/packages/kinefx/python3.7libs', 'C:/PROGRA~1/SIDEEF~1/HOUDIN~1.720/houdini/python3.7libs',
'C:/PROGRA~1/SIDEEF~1/HOUDIN~1.720/packages/kinefx/viewer_states', 'C:/PROGRA~1/SIDEEF~1/HOUDIN~1.720/houdini/viewer_states',
'C:/PROGRA~1/SIDEEF~1/HOUDIN~1.720/packages/kinefx/viewer_handles', 'C:/PROGRA~1/SIDEEF~1/HOUDIN~1.720/houdini/viewer_handles',
'C:/PROGRA~1/SIDEEF~1/HOUDIN~1.720/python37/lib/site-packages']
~~~
Windows' output differs slightly from Linux's: it doesn't allow us to run venv' python executable with the `pyvenv.cfg` being hidden.
# Using Houdini with our virtual environment
Before we install anything into our new virtual environment, we should make it aware of Python modules shipped with Houdini. If we install new packages with pip in our venv, we don't want to install some of Houdini's modules again, as this could cause some issues later on. As an example, we want to use the `numpy` (OpenCV's dependency) module from Houdini, we don't want pip to install it again in our venv. Additionally, we want Houdini to be able to use our venv's modules, like OpenCV.
The safest solution would:
- enable us to call venv's Python and see Houdini's modules (this will ensure that venv's pip does not install duplicates), and
- enable us to call Houdini's python (`hython`) and see our venv's modules (so that we can actually use them in Houdini)
In addition to using venv's python executable for controling what modules are visible, we can set the environment variable [`PYTHONPATH`](https://docs.python.org/3.7/using/cmdline.html#envvar-PYTHONPATH) to include additional folders containing desired modules. This gives us a granular control about what modules are visible to Python in our environment. This lets us connect our venv with Houdini.
I prefer writing small shell scripts to make the environment reproducible and easy to test.
Create `hou_venv_init.sh` for Linux in venv's parent directory, `/home/juraj/hou_venv_init.sh`:
~~~ sh linenumbers
#!/bin/sh
# Activate venv
source /home/juraj/hou_venv/bin/activate
# Make our venv's modules visible to hython
export PYTHONPATH=/home/juraj/hou_venv/lib/python3.7/site-packages
# Make Houdini's modules visible to venv's python
export PYTHONPATH=$PYTHONPATH:/opt/hfs19.0.720/python/lib/python3.7/site-packages-forced:/opt/hfs19.0.720/python/lib/python3.7/site-packages
# Add Houdini's executables to our PATH env var, this lets us call hython, houdini directly
export PATH=/opt/hfs19.0.720/bin:$PATH
~~~
Or `hou_venv_init.bat` for Windows, in `C:\Users\Juraj\hou_venv_init.bat`:
~~~ cmd linenumbers
@rem Activate venv
call hou_venv\Scripts\activate
@rem Make our venv's modules visible to hython
set "PYTHONPATH=C:\Users\Juraj\hou_venv\Lib\site-packages"
@rem Make Houdini's modules visible to venv's python
set "PYTHONPATH=%PYTHONPATH%;C:\Program Files\Side Effects Software\Houdini 19.0.720\python37\lib\site-packages-forced;C:\Program Files\Side Effects Software\Houdini 19.0.720\python37\lib\site-packages"
@rem Add Houdini's executables to our PATH env var, this lets us call hython, houdini directly
set "PATH=C:\Program Files\Side Effects Software\Houdini 19.0.720\bin;%PATH%"
~~~
I don't need to include all of Houdini-specific modules, just those that are general Python modules available on [PyPI](https://pypi.org/). So I am ignoring the folder `/opt/hfs19.0.720/houdini/python3.7libs` and folders specific to kinefx, viewer states etc.
**Note for Linux users:** Houdini 19.0.720 on Linux ships with pip 22.0.4, unlike on Windows which doesn't include pip. This could lead to errors if there's a large version difference between your venv and Houdini pip versions. One easy fix is to run `(hou_venv)$ python -m pip install --upgrade pip==22.0.4` from the venv, which will match venv's pip version to the version included in Houdini. Windows users don't need to do this step.
Let's source the initialization script and see if Houdini modules are visible to the venv. I'm calling this from the directory where `hou_venv_init` was created (`/home/juraj/`, or `C:\Users\Juraj`):
~~~ bash
🐧
(hou_venv)$ deactivate # Deactivate our venv
$ cd .. # Move to the parent directory
$ source hou_venv_init.sh # Call our initialization script
(hou_venv)$ pip freeze # List available packages
asn1crypto==0.24.0
bcrypt==3.1.7
certifi==2018.1.18
cffi==1.12.3
chardet==3.0.4
click==7.1.2
cryptography==2.7
demjson==2.2.4
ecdsa==0.13
Flask==1.0.3
Flask-Script==2.0.6
furl==2.1.0
future==0.18.2
Genshi==0.7.3
idna==2.6
imageio==2.6.1
itsdangerous==0.24
Jinja2==2.10.1
libsass==0.19.2
lxml==4.3.4
lz4==3.1.0
Mako==1.0.12
MarkupSafe==0.23
nose==1.3.7
numpy==1.19.5
orderedmultidict==1.0.1
paramiko==2.6.0
Pillow==6.1.0
plumbum==1.6.7
psutil==5.8.0
pycrypto==2.6.1
pycurl==7.43.0.3
Pygments==2.4.2
PyNaCl==1.3.0
PyOpenGL==3.1.1a1
pyparsing==2.4.7
pytz==2019.3
requests==2.18.4
rpyc==4.1.0
simplejson==3.16.0
six==1.13.0
urllib3==1.22
Werkzeug==0.15.4
Whoosh==3.0.0
~~~
~~~ cmd
🪟
(hou_venv)>deactivate
>cd ..
>call hou_venv_init.bat
(hou_venv)>pip freeze
asn1crypto==0.24.0
bcrypt==3.1.7
certifi==2018.1.18
cffi==1.12.3
chardet==3.0.4
click==7.1.2
cryptography==2.7
demjson==2.2.4
ecdsa==0.13
Flask==1.0.3
Flask-Script==2.0.6
furl==2.1.0
future==0.18.2
Genshi==0.7.3
idna==2.6
imageio==2.6.1
itsdangerous==0.24
Jinja2==2.10.1
lxml==4.3.4
Mako==1.0.12
markupsafe==0.23
nose==1.3.7
numpy==1.19.5
orderedmultidict==1.0.1
paramiko==2.6.0
Pillow==6.1.0
plumbum==1.6.7
psutil==5.8.0
pycrypto==2.6.1
pycurl==7.43.0.3
Pygments==2.4.2
PyNaCl==1.3.0
PyOpenGL==3.1.1a1
pyparsing==2.4.7
python-lz4==3.1.0
pytz==2019.3
requests==2.18.4
rpyc==4.1.0
simplejson==3.16.0
six==1.13.0
urllib3==1.22
Werkzeug==0.15.4
whoosh==3.0.0
~~~
Congratulations, now we have a virtual environment aware of Houdini modules (and vice versa), thanks to our small initialization script.
# Installing OpenCV
Let's install OpenCV with pip into our venv now.
~~~ bash
🐧
(hou_venv)$ pip install opencv-python # Install OpenCV
Collecting opencv-python
Downloading opencv_python-4.6.0.66-cp36-abi3-manylinux_2_17_x86_64.manylinux2014_x86_64.whl (60.9 MB)
━━━━━━━━━━━━━━━━━━━━━━━━━━━━━━━━━━━━━━━━ 60.9/60.9 MB 34.5 MB/s eta 0:00:00
Requirement already satisfied: numpy>=1.14.5 in /opt/hfs19.0.720/python/lib/python3.7/site-packages (from opencv-python) (1.19.5)
Installing collected packages: opencv-python
Successfully installed opencv-python-4.6.0.66
~~~
~~~ cmd
🪟
(hou_venv)>pip install opencv-python
Collecting opencv-python
Downloading opencv_python-4.7.0.68-cp37-abi3-win_amd64.whl (38.2 MB)
|████████████████████████████████| 38.2 MB 6.4 MB/s
Requirement already satisfied: numpy>=1.17.0; python_version >= "3.7" in c:\program files\side effects software\houdini 19.0.720\python37\lib\site-packages (from opencv-python) (1.19.5)
Installing collected packages: opencv-python
Successfully installed opencv-python-4.7.0.68
~~~
The line `Requirement already satisfied: numpy>=1.14.5 in /opt/hfs19.0.720...` indicates that pip is aware of Houdini's Python modules and that's exactly what we want.
We can also check venv's folder structure and the updated pip packages list:
Click to expand
~~~ bash
🐧
(hou_venv)$ tree hou_venv -L 4
hou_venv
├── bin
│ ├── activate
│ ├── activate.csh
│ ├── activate.fish
│ ├── easy_install
│ ├── easy_install-3.7
│ ├── pip
│ ├── pip3
│ ├── pip3.7
│ ├── python -> python3.7
│ ├── python3 -> python3.7
│ └── python3.7 -> /usr/bin/python3.7
├── include
├── lib
│ └── python3.7
│ └── site-packages
│ ├── cv2
│ ├── easy_install.py
│ ├── opencv_python-4.6.0.66.dist-info
│ ├── opencv_python.libs
│ ├── pip
│ ├── pip-22.0.4.dist-info
│ ├── pkg_resources
│ ├── __pycache__
│ ├── setuptools
│ └── setuptools-47.1.0.dist-info
├── lib64 -> lib
└── pyvenv.cfg
(hou_venv)$ pip freeze
asn1crypto==0.24.0
bcrypt==3.1.7
certifi==2018.1.18
cffi==1.12.3
chardet==3.0.4
click==7.1.2
cryptography==2.7
demjson==2.2.4
ecdsa==0.13
Flask==1.0.3
Flask-Script==2.0.6
furl==2.1.0
future==0.18.2
Genshi==0.7.3
idna==2.6
imageio==2.6.1
itsdangerous==0.24
Jinja2==2.10.1
libsass==0.19.2
lxml==4.3.4
lz4==3.1.0
Mako==1.0.12
MarkupSafe==0.23
nose==1.3.7
numpy==1.19.5
opencv-python==4.6.0.66
orderedmultidict==1.0.1
paramiko==2.6.0
Pillow==6.1.0
plumbum==1.6.7
psutil==5.8.0
pycrypto==2.6.1
pycurl==7.43.0.3
Pygments==2.4.2
PyNaCl==1.3.0
PyOpenGL==3.1.1a1
pyparsing==2.4.7
pytz==2019.3
requests==2.18.4
rpyc==4.1.0
simplejson==3.16.0
six==1.13.0
urllib3==1.22
Werkzeug==0.15.4
Whoosh==3.0.0
~~~
~~~ cmd
🪟
(hou_venv)>tree hou_venv /A /F
C:\USERS\JURAJ\HOU_VENV
| pyvenv.cfg
|
+---Include
+---Lib
| \---site-packages
| | easy_install.py
| |
| +---cv2
| |
| +---opencv_python-4.7.0.68.dist-info
| |
| +---pip
| |
| +---pip-20.1.1.dist-info
| |
| +---pkg_resources
| |
| +---setuptools
| |
| +---setuptools-47.1.0.dist-info
| |
| \---__pycache__
|
\---Scripts
activate
activate.bat
Activate.ps1
deactivate.bat
easy_install-3.7.exe
easy_install.exe
pip.exe
pip3.7.exe
pip3.exe
python.exe
pythonw.exe
(hou_venv)>pip freeze
asn1crypto==0.24.0
bcrypt==3.1.7
certifi==2018.1.18
cffi==1.12.3
chardet==3.0.4
click==7.1.2
cryptography==2.7
demjson==2.2.4
ecdsa==0.13
Flask==1.0.3
Flask-Script==2.0.6
furl==2.1.0
future==0.18.2
Genshi==0.7.3
idna==2.6
imageio==2.6.1
itsdangerous==0.24
Jinja2==2.10.1
lxml==4.3.4
Mako==1.0.12
markupsafe==0.23
nose==1.3.7
numpy==1.19.5
opencv-python==4.7.0.68
orderedmultidict==1.0.1
paramiko==2.6.0
Pillow==6.1.0
plumbum==1.6.7
psutil==5.8.0
pycrypto==2.6.1
pycurl==7.43.0.3
Pygments==2.4.2
PyNaCl==1.3.0
PyOpenGL==3.1.1a1
pyparsing==2.4.7
python-lz4==3.1.0
pytz==2019.3
requests==2.18.4
rpyc==4.1.0
simplejson==3.16.0
six==1.13.0
urllib3==1.22
Werkzeug==0.15.4
whoosh==3.0.0
~~~
Now we should be able to import the `cv2` module in Houdini, or `hython` (which is a Python interpreter with Houdini modules imported).
~~~ bash
🐧
(hou_venv)$ python # Check venv's python
Python 3.7.16 (default, Dec 7 2022, 01:12:19)
[GCC 9.4.0] on linux
Type "help", "copyright", "credits" or "license" for more information.
>>> import cv2
>>> exit()
(hou_venv)$ hython # Check Houdini's hython
Python 3.7.13 (default, Jun 14 2022, 11:41:42)
[GCC 9.3.1 20200408 (Red Hat 9.3.1-2)] on linux
Houdini 19.0.720 hou module imported.
Type "help", "copyright", "credits" or "license" for more information.
>>> import cv2
>>> exit()
(hou_venv)$ houdini # Launch Houdini and try importing OpenCV in Python Shell pane
~~~
~~~ cmd
🪟
(hou_venv)>python
Python 3.7.9 (tags/v3.7.9:13c94747c7, Aug 17 2020, 18:58:18) [MSC v.1900 64 bit (AMD64)] on win32
Type "help", "copyright", "credits" or "license" for more information.
>>> import cv2
>>> exit()
(hou_venv)>hython
Python 3.7.13 (1 file(s) copied., Jun 14 2022, 11:48:46) [MSC v.1929 64 bit (AMD64)] on win32
Houdini 19.0.720 hou module imported.
Type "help", "copyright", "credits" or "license" for more information.
>>> import cv2
>>> exit()
(hou_venv)>houdini
~~~

If we don't see any errors then it means that our setup works well and we can now go and make something useful with it.
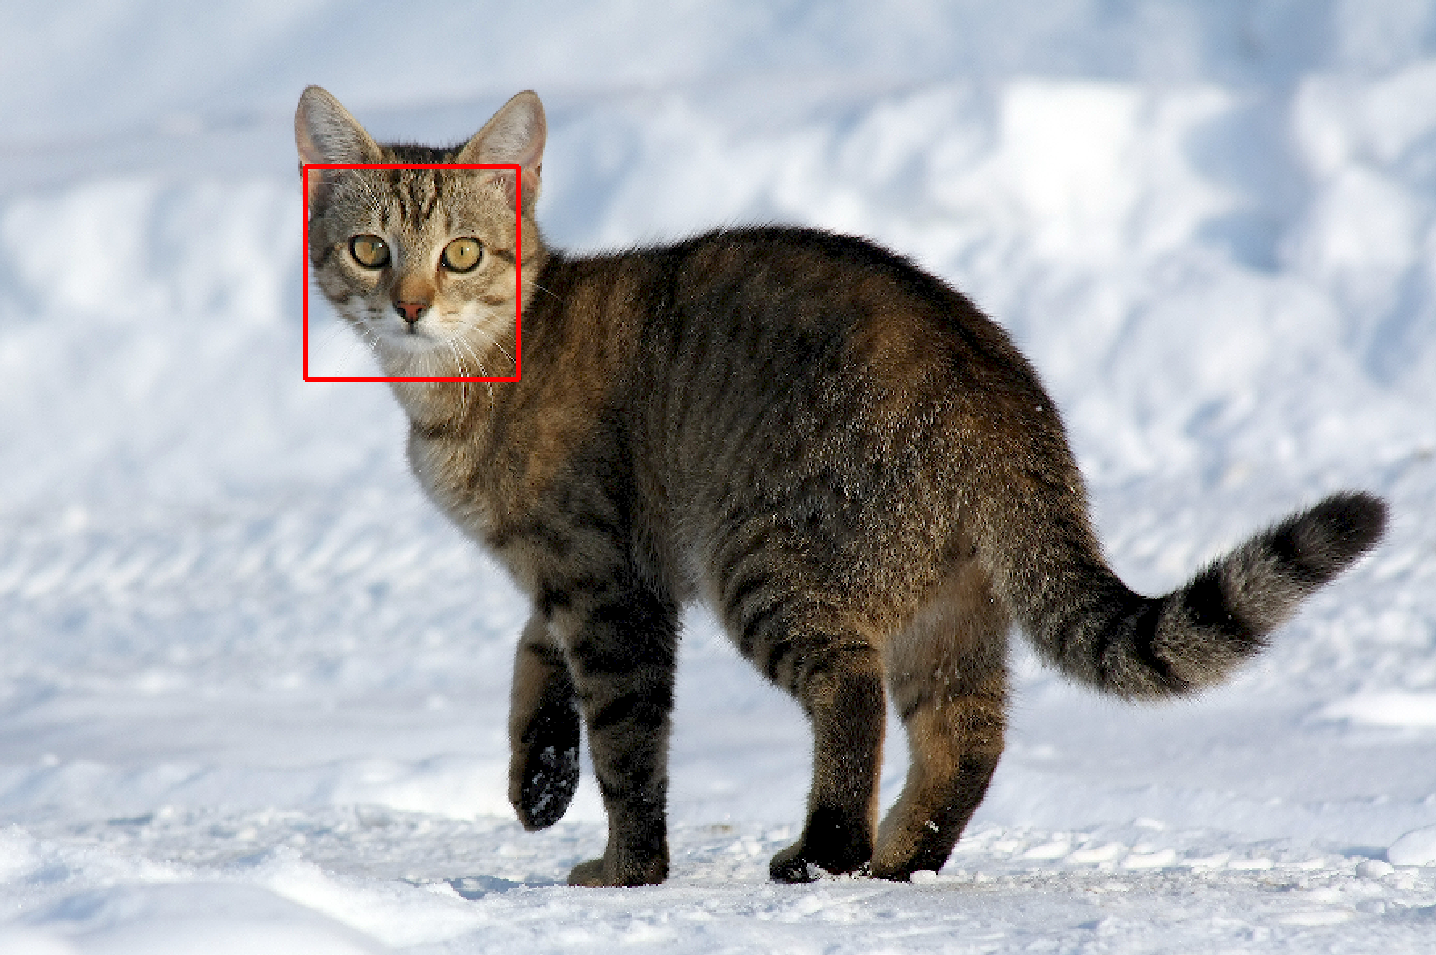
# Making a simple COP node using OpenCV
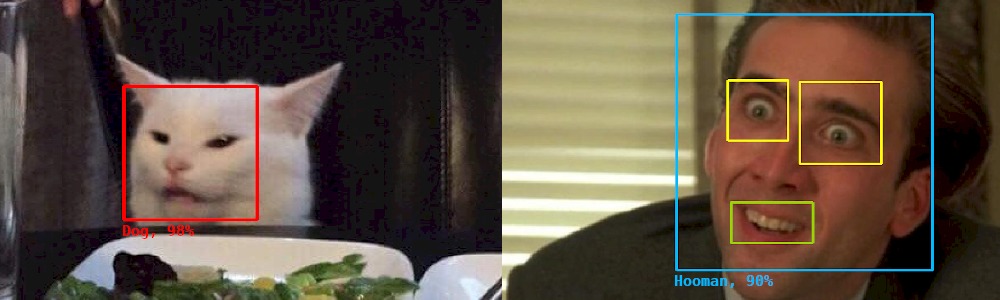
This section will demonstrate a basic usage of OpenCV in Houdini, for example detecting faces in COPs. The point of this example is to show how to use venv together with Houdini, not how to do a reliable face detection.
I will cut some corners in order to simplify the code. I will not be explaining every detail of working with OpenCV or Python COPs either. That is already well documented in documentation. Refer to Houdini docs about making [Python COPs](https://www.sidefx.com/docs/houdini19.5/hom/pythoncop.html) and take a look at [OpenCV's face detection tutorial](https://docs.opencv.org/3.4/db/d28/tutorial_cascade_classifier.html) as well.
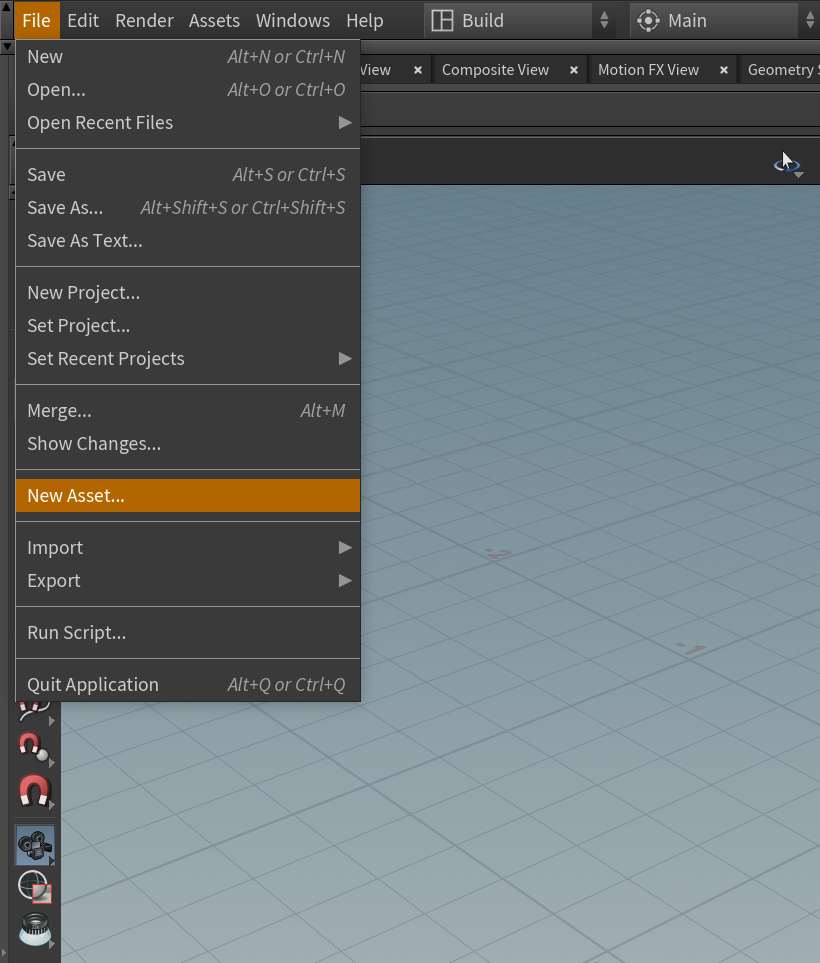
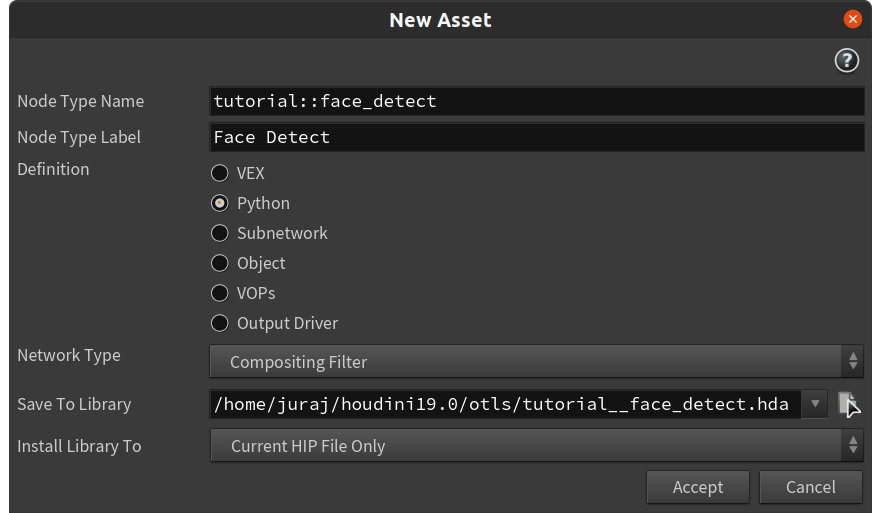
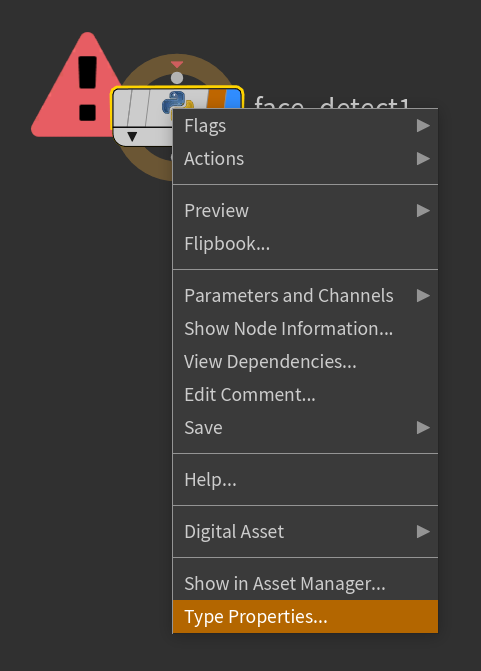
First, create a new Python filter COP:
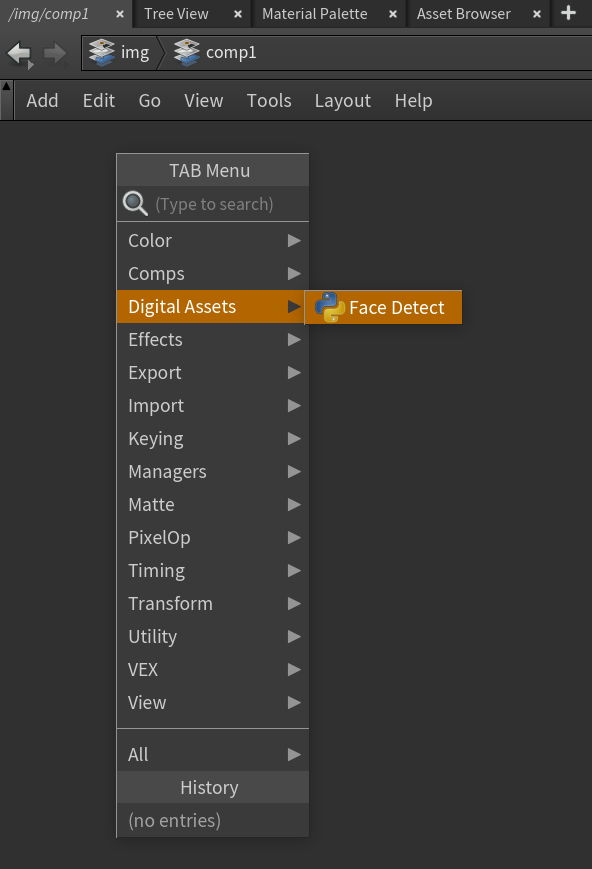
Now you can go to an _Image Network_ and create our new node and edit its properties. I also recommend hiding node's thumbnail by clicking on the ▲ icon, this will save us from a couple of errors later on.
We can see some default functionality in the _Code_ tab. This is the place where we will define our image processing.
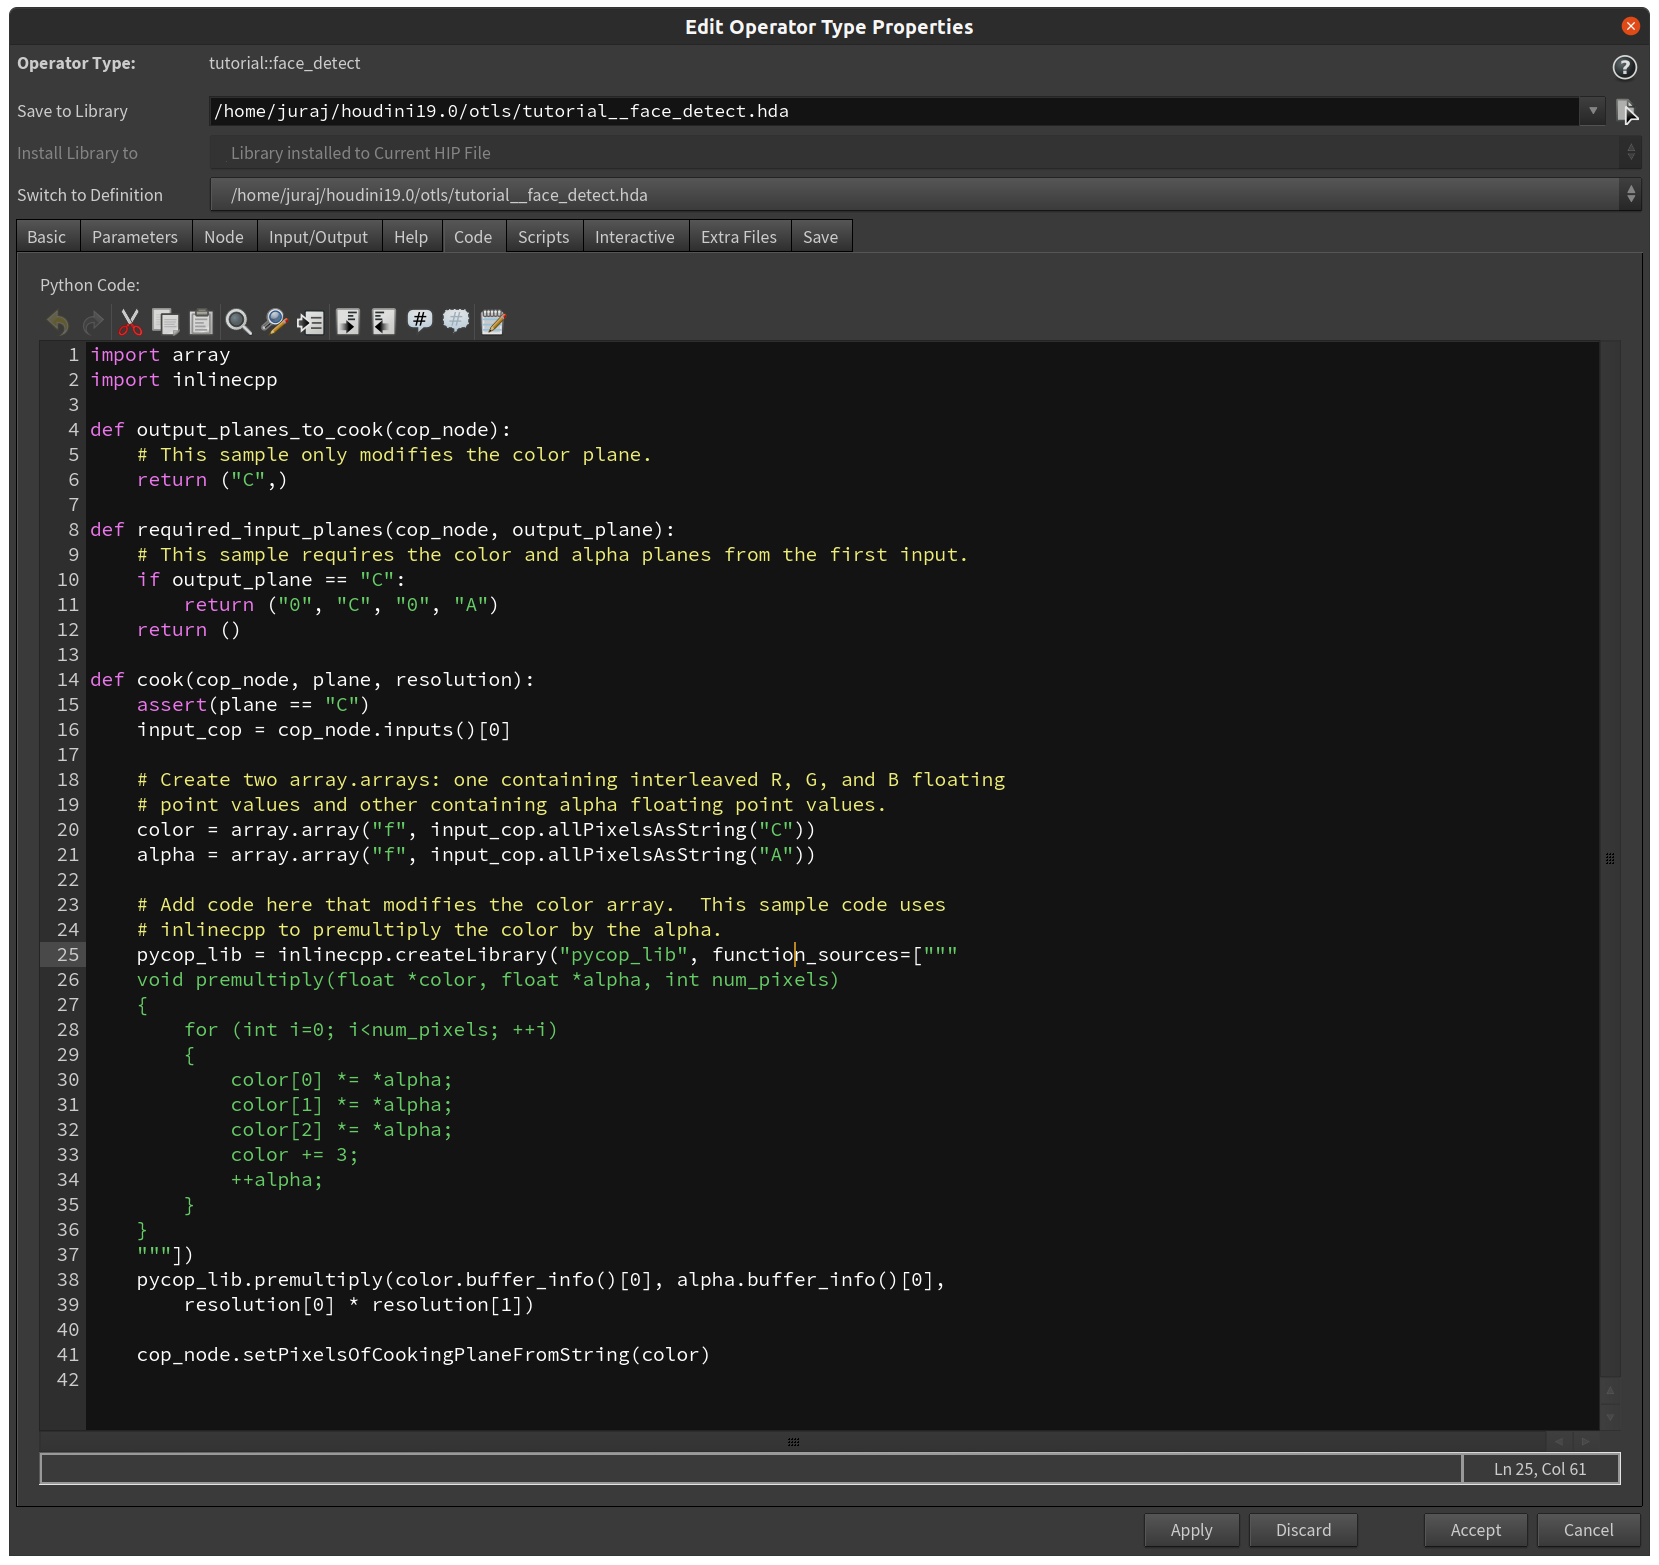
Replace the default code with ours:
~~~ python linenumbers
import os
import cv2
import hou
import numpy as np
def output_planes_to_cook(cop_node):
"""Specify image planes that will be processed"""
return ("C",)
def required_input_planes(cop_node, output_plane):
"""Specify required inputs"""
return ("0", "C")
def cook(cop_node, plane, resolution):
"""The main function"""
# Store a reference to a node connected to the 1st input
input_cop = cop_node.inputs()[0]
# Read node parameters
cascadeClassifier = cop_node.parm("cascadeClassifier").eval()
scaleFactor = cop_node.parm("scaleFactor").eval()
minNeighbors = cop_node.parm("minNeighbors").eval()
thickness = cop_node.parm("thickness").eval()
color = cop_node.parmTuple("color").eval()
# Convert color from 0-1 range to 0-255 range for OpenCV
color_int = [int(c * 255) for c in color]
# Grab the pixels from the corresponding plane in the input, then build
# a writable numpy array from the data
pixels = np.frombuffer(
input_cop.allPixelsAsString(plane), dtype=np.uint8).reshape(
resolution[1], resolution[0], 3).copy()
# Flip vertically for OpenCV - Houdini uses a different convention than OpenCV
pixels = cv2.flip(pixels, 0)
# Load a classifier included with OpenCV
face_cascade = cv2.CascadeClassifier(os.path.join(cv2.data.haarcascades, cascadeClassifier))
# Convert to grayscale
pixels_gray = cv2.cvtColor(pixels, cv2.COLOR_RGB2GRAY)
# Detect faces
faces = face_cascade.detectMultiScale(pixels_gray, scaleFactor, minNeighbors)
# Draw a rectangle around each detected face
for (x, y, w, h) in faces:
cv2.rectangle(pixels, (x, y), (x + w, y + h), color_int, thickness)
# Store the contents of the numpy array back into the pixel data (flip back for Houdini)
cop_node.setPixelsOfCookingPlaneFromString(cv2.flip(pixels, 0).data)
~~~
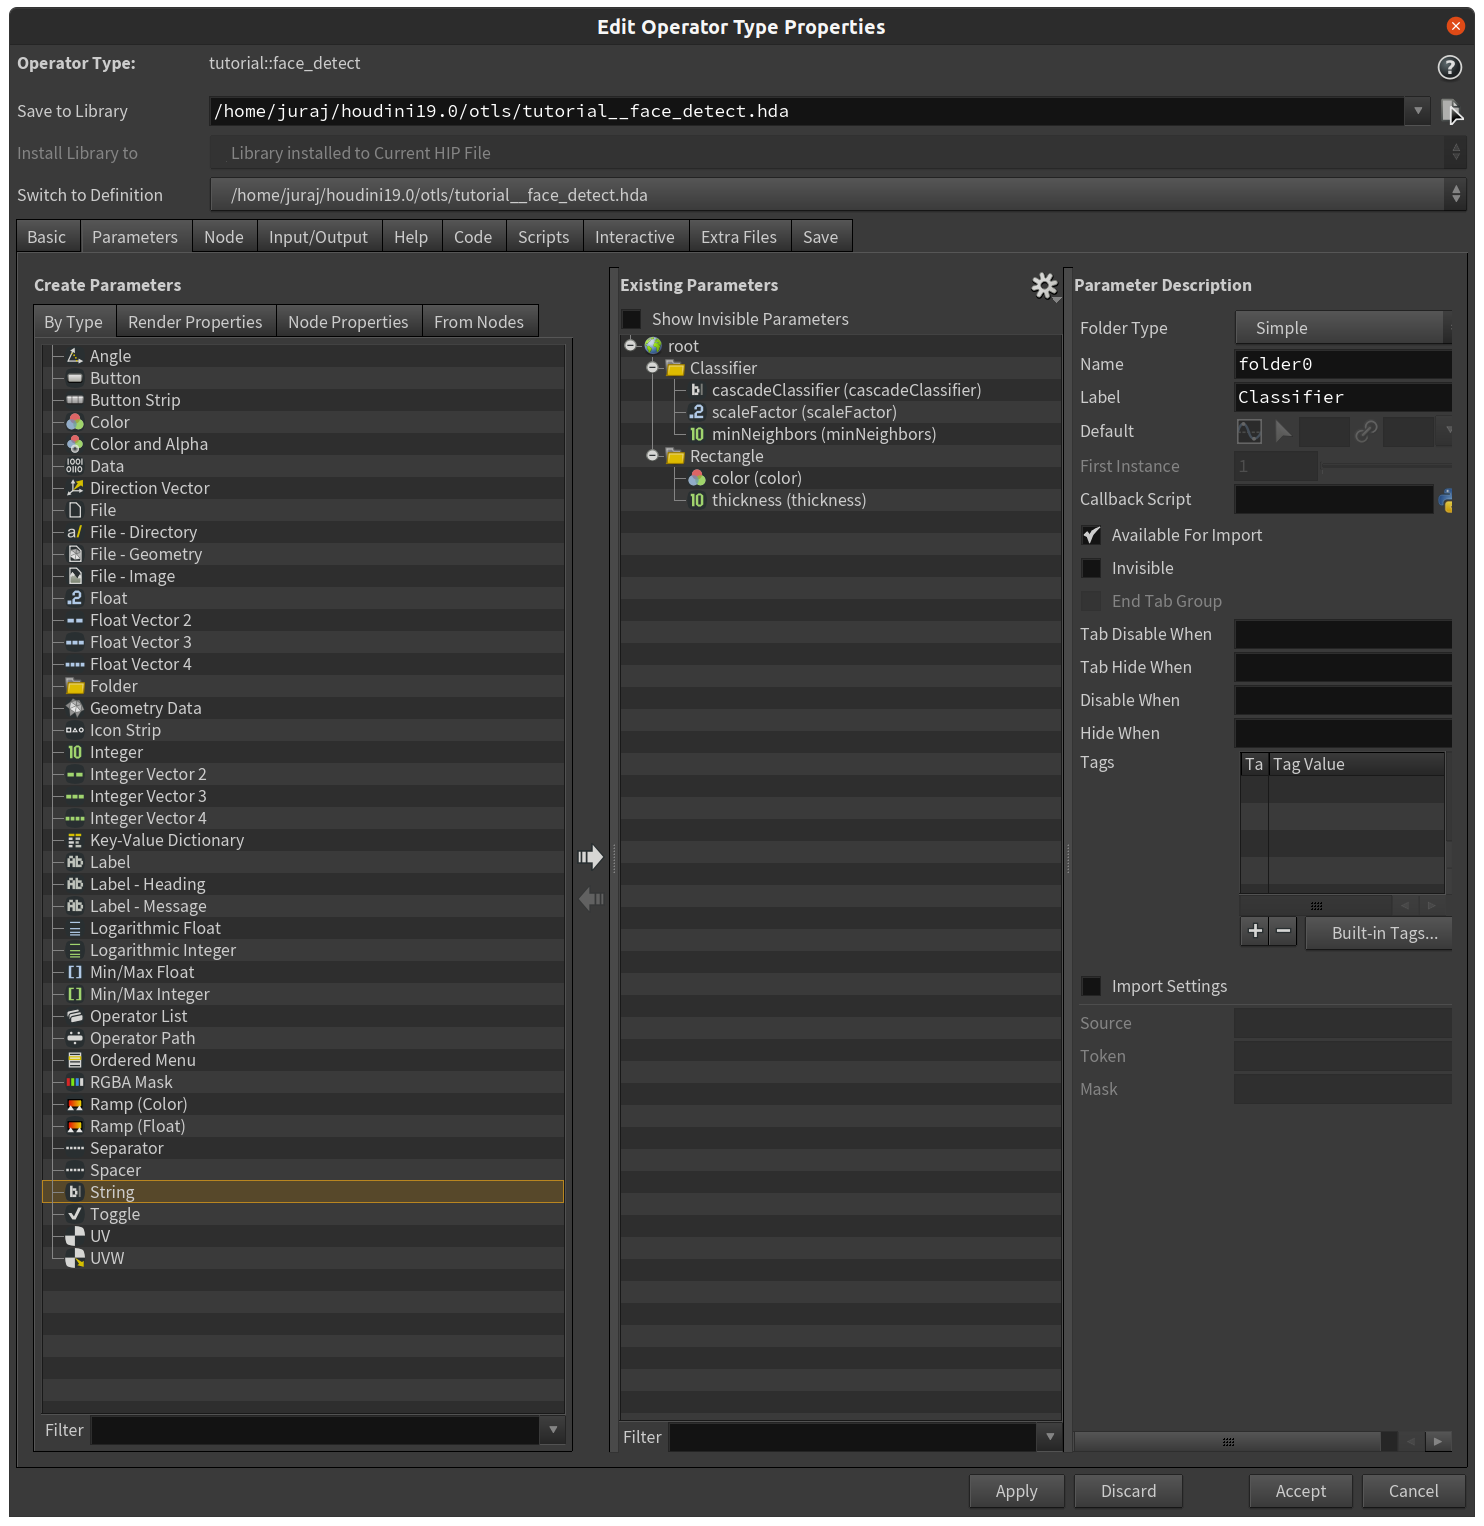
This code expects a couple of node parameters, let's add them too, in the _Parameters_ tab:
Name | Default value
------|--------------
cascadeClassifier | haarcascade_frontalcatface_extended.xml
scaleFactor | 1.1
minNeighbors | 3
color | 1, 0, 0
thickness | 1
[Node parameters]

Here's a short explanation of parameters
- **cascadeClassifier** specifies the name of a pre-trained Haar-cascade classifier, stored in XML
- Our code refers to classifiers included with the OpenCV module, they can be found at
- `hou_venv/lib/python3.7/site-packages/cv2/data/` on Linux
- `hou_venv\Lib\site-packages\cv2\data` on Windows
- They can be found also in the [OpenCV repository](https://github.com/opencv/opencv/tree/master/data/haarcascades)
- Here's a list for reference
- `haarcascade_fullbody.xml`
- `haarcascade_lowerbody.xml`
- `haarcascade_frontalface_alt_tree.xml`
- `haarcascade_eye_tree_eyeglasses.xml`
- `haarcascade_eye.xml`
- `haarcascade_frontalface_alt2.xml`
- `haarcascade_upperbody.xml`
- `haarcascade_russian_plate_number.xml`
- `haarcascade_frontalcatface.xml`
- `haarcascade_smile.xml`
- `haarcascade_profileface.xml`
- `haarcascade_frontalcatface_extended.xml`
- `haarcascade_righteye_2splits.xml`
- `haarcascade_licence_plate_rus_16stages.xml`
- `haarcascade_lefteye_2splits.xml`
- `haarcascade_frontalface_default.xml`
- `haarcascade_frontalface_alt.xml `
- **scaleFactor, minNeighbors** are parameters to the [`detectMultiScale()`](https://docs.opencv.org/3.4/d1/de5/classcv_1_1CascadeClassifier.html#aaf8181cb63968136476ec4204ffca498) function, which detects faces
- **color, thickness** are parameters to the [`rectangle()`](https://docs.opencv.org/4.x/d6/d6e/group__imgproc__draw.html#ga07d2f74cadcf8e305e810ce8eed13bc9) function, which draws the rectangle
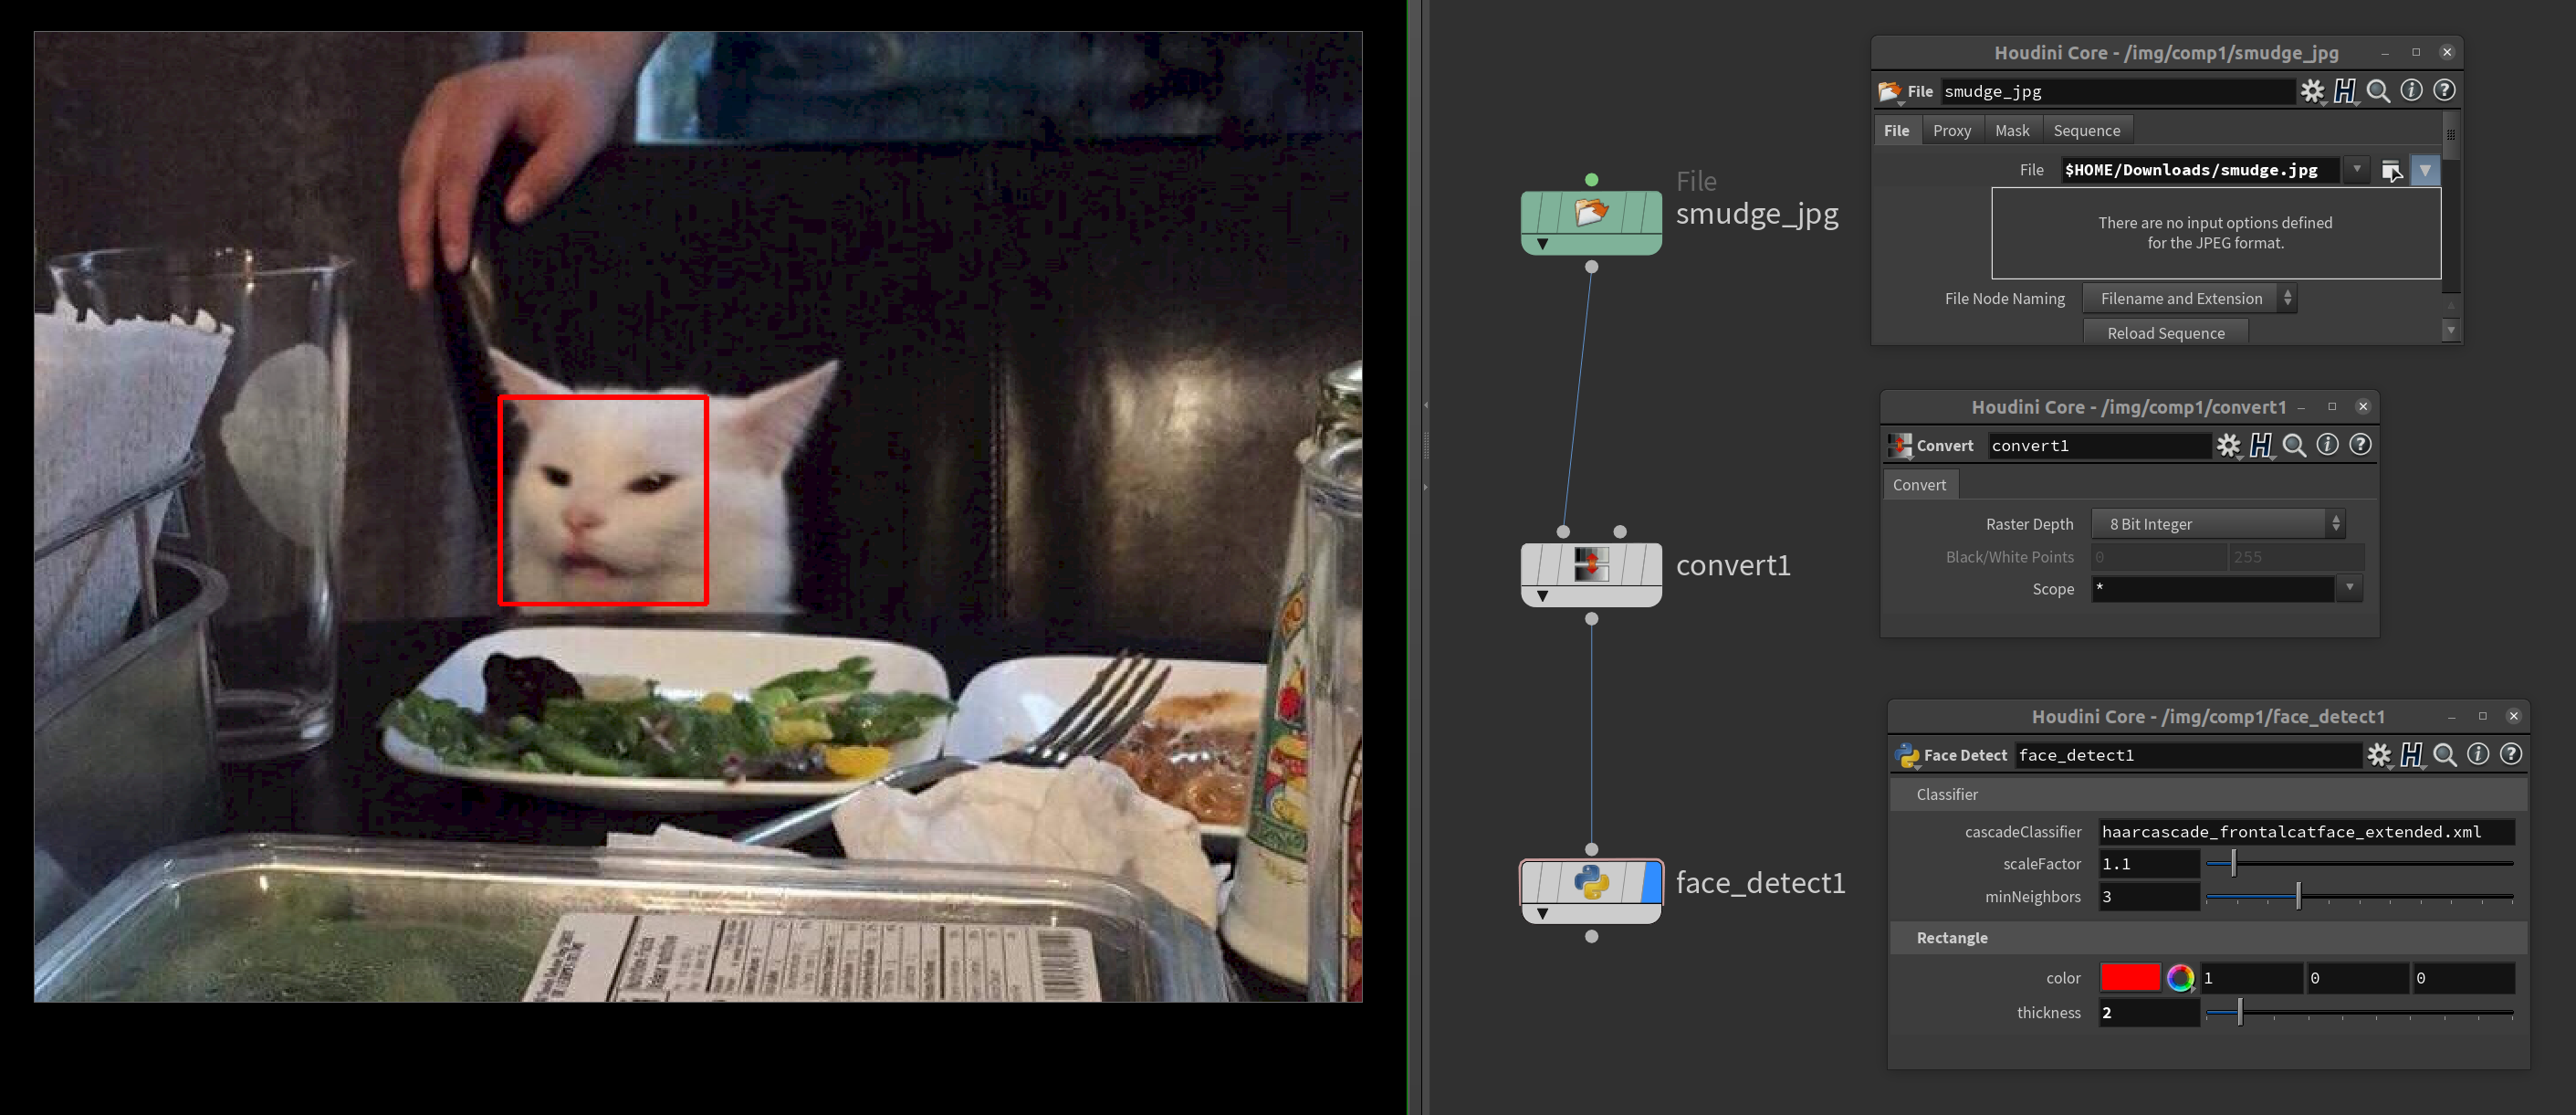
Now let's see how we can use our node and make something cool with it.
# Using our Face Detect COP
One limitation of our Python facial detection code is that it will work only with `8 Bit Integer` inputs, which can be set with a **Convert COP** node. This would be relatively easy to overcome, but I've decided not to, in order to keep the Python code simple for this post.
Othwerwise you'd see an error similar to this one:
~~~ none linenumbers
Error
Traceback (most recent call last):
File "", line 1, in
File "", line 36, in cook
ValueError: cannot reshape array of size 2439420 into shape (545,746,3)
~~~
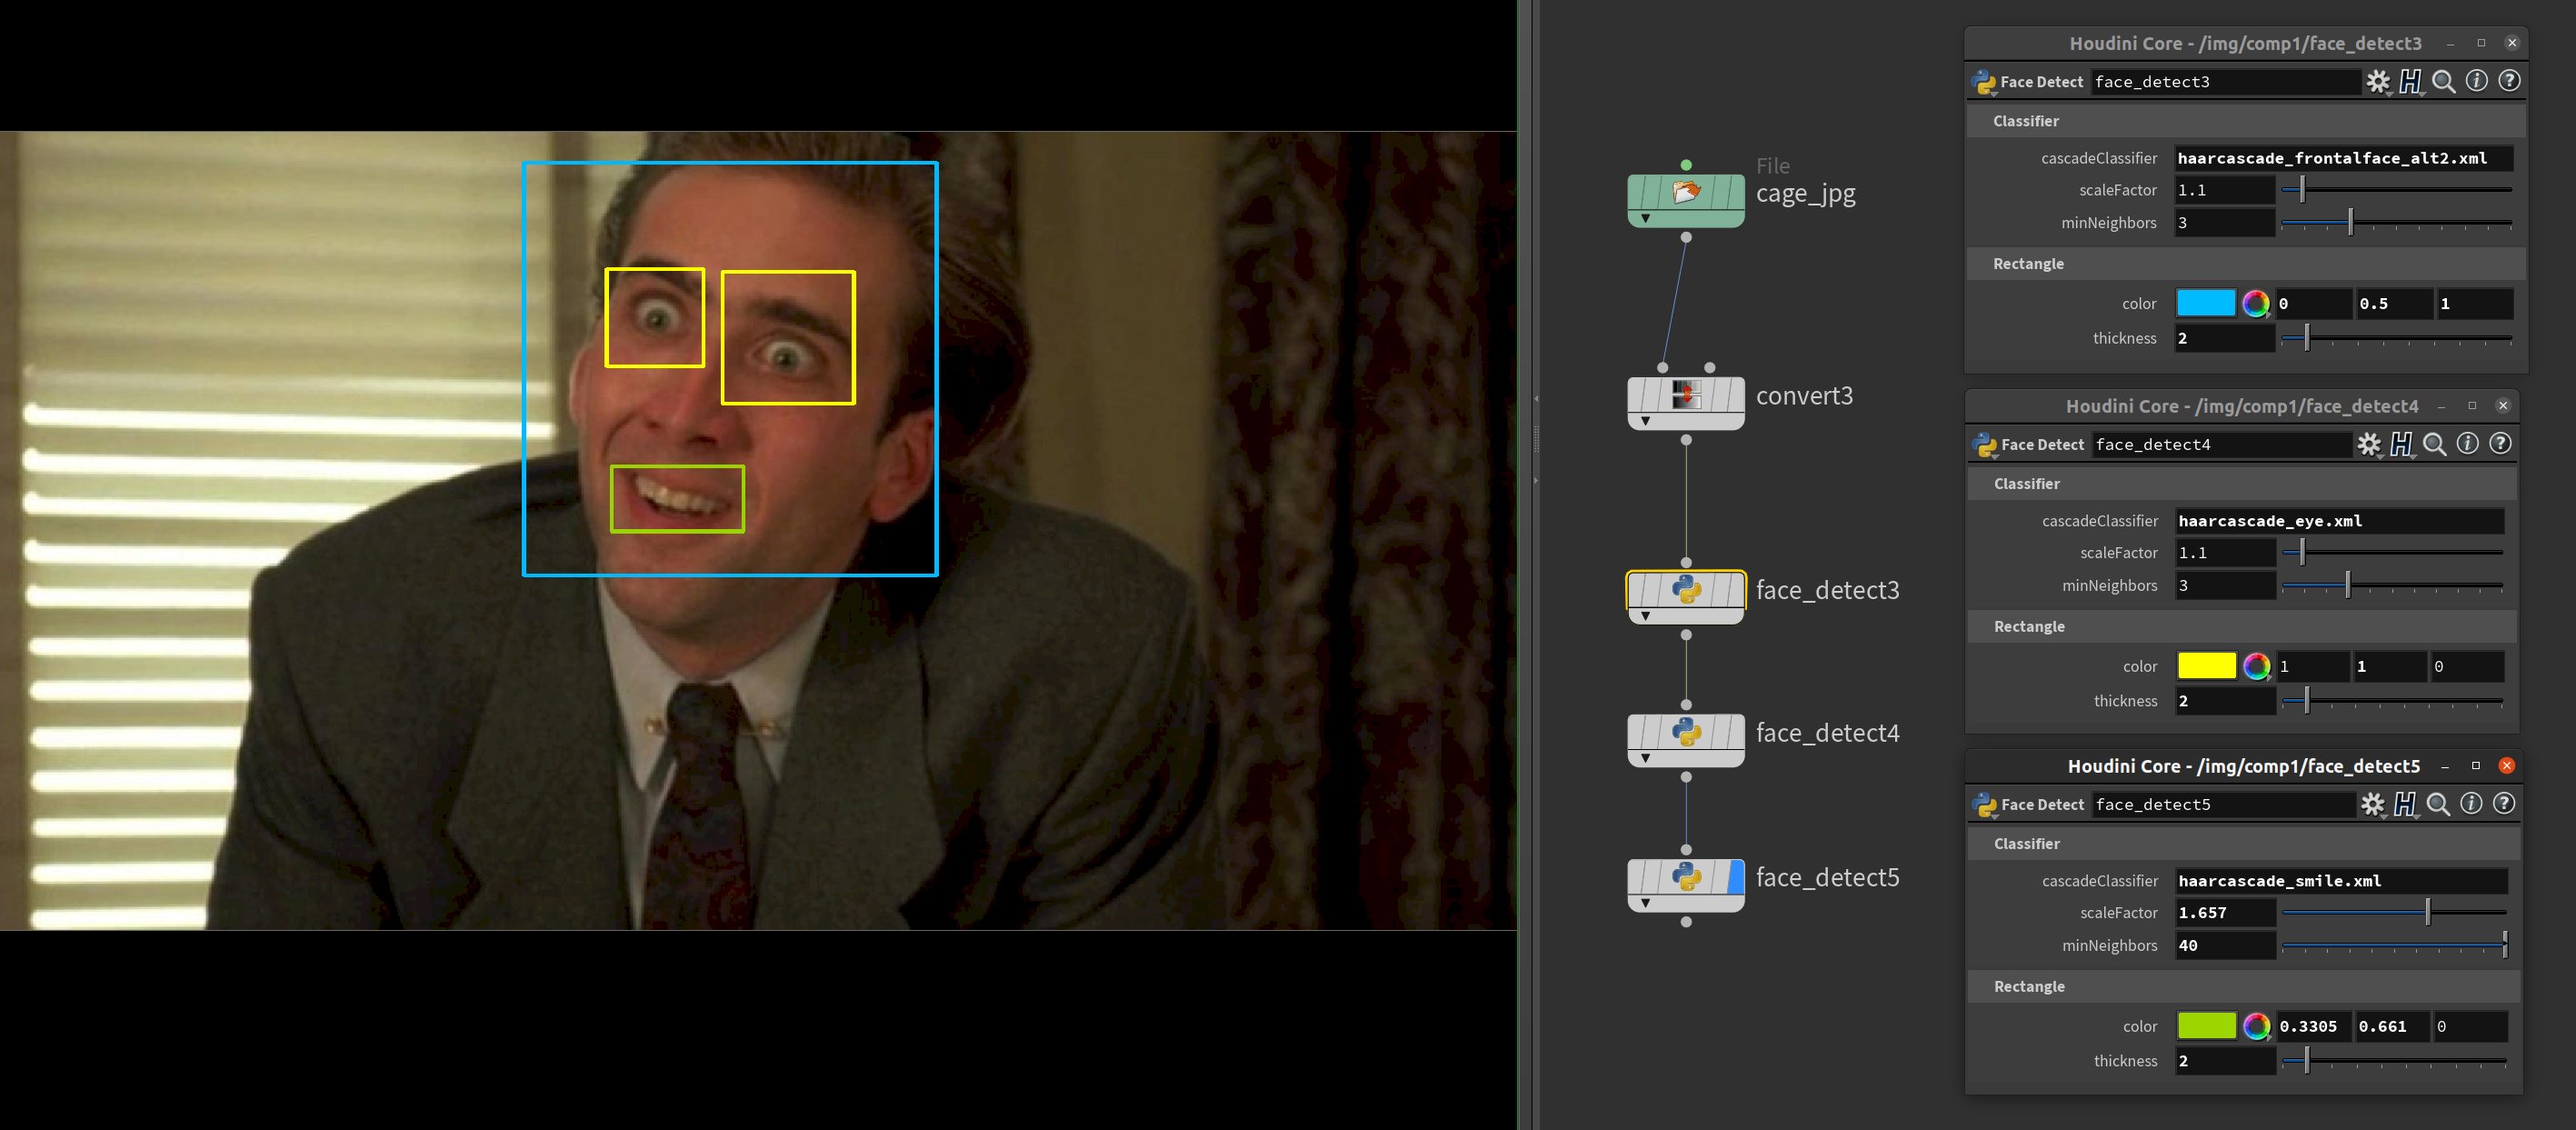
Our new node is relatively simple to use, replicate my setup and it should work well for you.
# Conclusion, next steps
Hopefully you can see that it can be quite useful to use virtual environment with Houdini. Now you can combine the rich ecosystem of Python packages with Houdini. Additional benefit of using venvs is the separation of development environments - you could have a separate venv for each project/tool you are working on, without package version clashes and other interferences. You can store your package dependencies in [`requirements.txt`](https://pip.pypa.io/en/stable/reference/requirements-file-format/), making it reproducible in the future, or on different computers.
The Face Detect COP node is a rather silly example, but I hope you get the idea. You can use COPs to do some interactive image processing, or do some fancy geometry processing in SOPs, or do something in TOPs, etc. Another potential use is to quickly build a simple-to-use UI for artists.
Unfortunately there's a bit of boilerplate involved, but it's usually just a one-time upfront cost. If you are aware of a simpler workflow then I'd be really interested in knowing it! :) This stuff was even more complicated in the past with Houdini and Python 2.7, but luckily those dark times are over.
There are plenty of further improvements we could do to make our node more useful. Some ideas, in random order:
- Make it work with more image plane bit depths
- Make the **cascadeClassifier** parameter an auto-populated menu for easier selection
- Store the detected face in an Alpha image plane, so that it can be used as a mask by downstream compositing nodes